Excel Macro Help - An introduction to Macros
Using Visual Basic in Microsoft Excel 2010 allows us to access and manipulate the underlying code of Excel. We do this so that we can have greater control of the behaviour of Excel spreadsheets and their calculations.
This blog will simply be an introduction to how you go about setting up the Visual Basic editor, creating a very simple example macro and storing that macro on your local drive.
First of all, when we are working with macros we need to take certain security precautions. Allowing the Excel program to execute macros is fine if we know what the code is and how it will work. However, as we receive new files to our PC every day, we cannot be sure that all macros on all Excel files are safe to run.
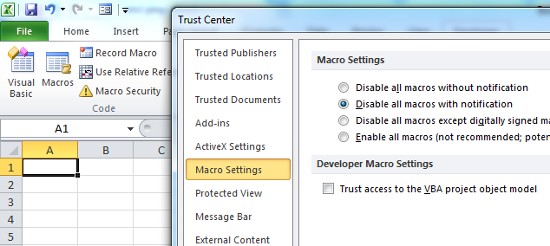
For this reason, we need to control the security settings in Microsoft Excel so that we are at least informed of the existence of any macros on a workbook before we open the file. To do this, open an Excel workbook and click on Developer in the menu bar. In the Code panel, select Macro Security and then Macro Settings. To be prompted of existing Macros on any Workbook you open, select Disable all macros with notification, as shown here.

We can now begin to explore writing macros - but before we do, place the number 2 in cell C3 and the number 3 in cell C4. Now return to the Code panel and click on Visual Basic.

As you can see, a new window pops up which we have re-sized it so that Sheet1 can be seen behind. On the left hand side of the new window we can see the Project pane where we can select the sheet we would like our macros to refer to. Here, we can see Sheet1 is already selected - if it is not selected, simply double click on the relevant sheet and the internal coding space will appear.
Before we write and code, it is important to understand how code is stored and called on to be used. The code you write in this Workbook for this Sheet may be used elsewhere and for this reason we would like to give it a degree of independence. We do this through the concept of Modules. When we write code for this workbook in a Module, the Module itself can be independently saved and Exported elsewhere. Likewise, we can Import a stored Module and put it to work in this workbook.
To do this, right click on Microsoft Excel Objects and select Insert, then Module.

We now have our coding space prepared as a Module which can be independently Exported as a .bas file (or a .bas file can be likewise Imported).
In the coding space, write Sub FirstMacro() where FirstMacro represents the name you give - and press return; A space between Sub FirstMacro() and Sub appears. This is the space within which we will write our Visual Basic commands. As an example, write the commend Cells(5,3) = Cells(3,3) + Cells(4,3) and hit return. You have now written your first macro.

To execute the macro, click the small green play button on the Visual Basic editor tool bar and you will see the sum of our two cells in the C5. As you may have understood, macros do not read cell coordinates in the usual way; instead they use numeric references for both the x and y axis. Therefore, cell C5 becomes (5,3).
Finally, we would like to save our workbook. However, simply clicking save in either the macro editor or on the main workbook will bring up the error as seen below.

To avoid this, we need to save our macro enabled workbook in a .xlsm file format:

This is an over simplified initial orientation to help you through your first steps with Excels powerful Visual Basic editor for writing macros. To really get to grips with Visual Basic, contact the Excel4Business experts.


